
What type of clams are found on Prince Edward Island
I dig my clams on PEI, but the information on how to dig clams written here can be used anywhere clams are found. The species of clam listed here are found throughout most of Atlantic Canada and the North Eastern United States of America.
There are four types of clams that I dig for on PEI. They are bar clams, quahogs, soft shell clams, and razor clams.
This post is not meant to be used as a safety guide, read all government issued safety recommendations when harvesting your own food from the wild.
This post uses amazon affiliate links. I receive commission from any sales at no additional cost to yourself.
Bar Clams
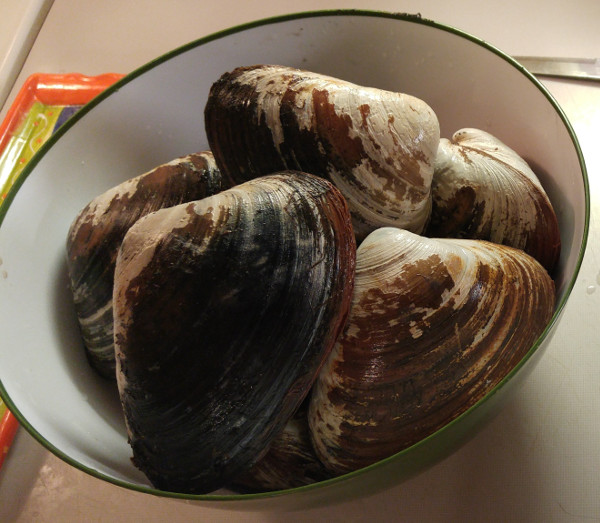
The bar clam (Spisula solidissima) is also know as the Atlantic surf clam. These are the kind of clams that PEI is known for, and are quite impressive in size. They can be found on most of Prince Edwards Island’s beaches at low tide. Bar clams grow quite large, and even a few of them are enough for a meal (or a feed) of clams.
It’s a very tasty clam, although there’s a bit of a trick to preparing it properly (which I go into some detail on further down). There exists a commercial fishery for bar clams in the Maritime’s. The primary customer of this fishery is sushi restaurants in Japan.
As the name suggests, they can readily be found on sand bars at the beach when the tide is out. They are typically not buried very deep, so require very little digging. There’s a good chance you may find some partially exposed without digging at all!
Bar clams are also an effective bait for striped bass fishing. They are just as effective as other commonly used baits such as eels, squid, or mackerel.
Soft Shell Clams
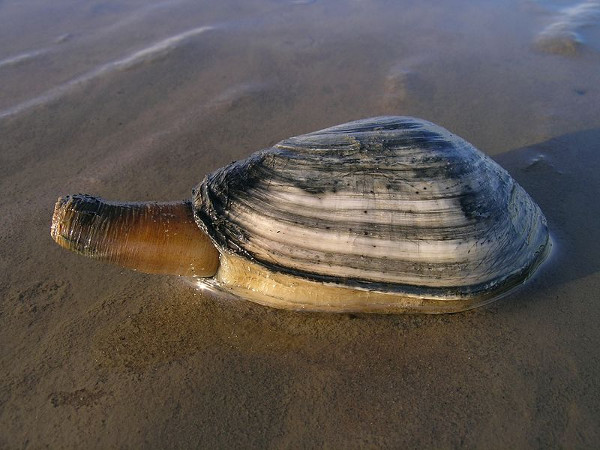 Soft shell clams (Mya arenaria) are also know as steamers, longnecks, or piss clams. They get the name soft shell clam from the fact that the shell is quite thin and brittle. It’s quite easy to accidentally break their shells so they should be handled with care, especially when digging or shucking them.
They get the name piss clams from the fact that they will squirt water out of their holes when you step near them. They will also squirt you with water when handling them right after they’ve been dug, and when you’re preparing them in the kitchen.
The species is widely consumed, and its excellent steamed or pan fried. I find the flavour and texture lends itself especially well to being breaded and deep fried.
They’re typically buried a few feet deep, and require a bit of effort to dig. You will not find many (if any) soft shell clams on sand bars, as they prefer to bury themselves in tidal mudflats. This means they are found on different beaches or different parts of the beach than the other species of clams listed here.
Razor clams
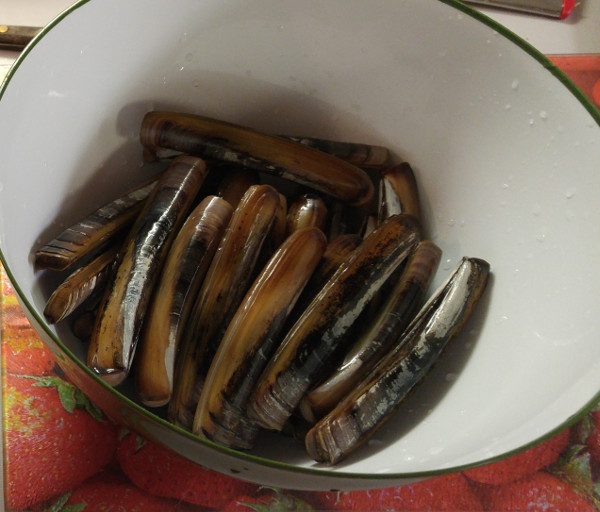
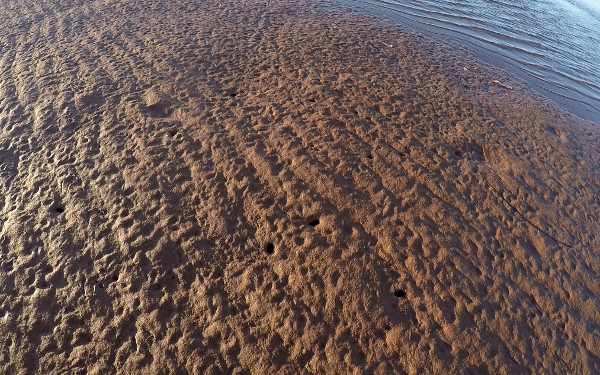
The Atlantic razor clam (Ensis directus) also known as jacknife clam or razor fish, is the smallest commonly harvested species of clam on PEI. They get their name both because they are shaped like an old straight razor, and because they can easily slice your foot if you step on one. They are often positioned upright in the sand, and shells will remain that way even after the clam has died. These old shells from dead clams can give a nasty cut if stepped on.
I would argue razor clams are also the most delicious clam on our beached, although it is also the most labour intensive to harvest and prepare (more details on that further down).
Quahogs
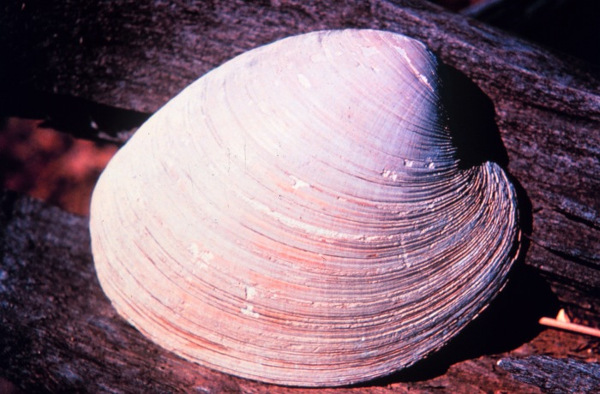
Quahogs are another large species of clam, although generally a bit smaller than bar clams. They have thicker shells with a slightly different shape, and different colouration. They’re usually whiter in colour than bar clams, with a “cleaner” looking shell. They taste quite similar (as in delicious) to , so I don’t go out of my way to find them since bar clams are so abundant.
Other Species
The Maritime’s have recreational harvesting opportunities for other species of bivalves as well. These include mussels, scallops, and oysters. The regulations and legal species vary between Nova Scotia, New Brunswick, and Prince Edward Island so check your local regulations before harvesting. I don’t have any experience harvesting these species though, so I won’t go into detail on them here.
What equipment do you need to dig clams?
Honestly you don’t need much as far as equipment goes, there’s a few different choices though.
Get yourself a proper clam shovel, and don’t cheap out on it. I find most general use shovels are not sturdy enough to handle digging in the wet sand. Eventually most shovels will fail, either the handle breaks or the connection point between the shovel and handle lets go. Purpose built clam shovels are built sturdy enough to handle the weight of the sand. A shovel will allow you to dig for any type of clam found on PEI.
A long handled clam shovel (Amazon Link) that’s sturdy is a great choice, especially for digging the deep holes needed for soft shell clams.
A sturdy Garden Hand Trowel (Amazon Link) is actually my preferred tool for digging clams. I don’t mind getting on my knees to dig, and I like the extra control it gives me when digging soft shell clams or razor clams.
If you’re at the beach and want to dig just a few clams, a sturdy bar clam shell works surprisingly well as an impromptu shovel. A shell works very well for digging razor clams, and is an okay choice for digging bar clams. It can also be used for digging soft shell clams, although that’s a very labour intensive process since they’re so deep.
A clam rake can be used to very quickly cover ground looking for bar clams. Since they’re so shallow, a rake is ideal. The rake should be narrow with a small amount of sturdy prongs, rather than wide with alot of smaller prongs. This will make dragging it through the wet sand much easier.
A short handled rake (Amazon Link) will last you longer. The wet sand on the beach is very heavy and puts alot of stress on the handle. Smaller hand rakes don’t have to endure the same leverage, and tend to last much longer.
You can also try a Clam Gun (Amazon Link). Here’s a video on how the gun is used to catch Pacific razor clams (which is a different species of clam than the Atlantic razor clams we have here). They seem quite popular in other areas, but I can’t speak to their effectiveness personally as I don’t have one. I don’t see why they wouldn’t work the same on our clams as the pacific variety though.
After you dig your clams, you need a way to store them. A cooler or a five gallon bucket with a sturdy handle will work just fine. During the summer heat, bring some ice as well to keep them cool.
What time do you go digging for clams?
You want to go at low tide when the beach is exposed. I generally go two hours before low tide. The water’s low enough at this time for most of the beach to be exposed. If you go clam digging right at low tide, the tide is going to be coming in as you’re clamming. This means you have to keep a constant eye on the water to avoid getting stranded on a sand bar.
The strength of the tides also varies by time of the month. There is a peak period in which tides are quite extreme, and a more moderate periods with less extreme tides. It’s best to go at the time of the month with stronger tides so more of the beach is exposed.
This is a great tool from fisheries an Oceans Canada that tells you tide times and heights at specific areas. The tide chart I’ve linked to is for PEI, but the tool has tide information available throughout Canada.
The best time of year for digging clams is spring or fall. This is primarily to avoid digging in summer heat or the winter cold, as the clams will be there all year ’round. It’s so hot during July and August that it can be hard to keep your clams alive while your digging, same goes for the cold in winter.
Something to keep mind is the risk of marine biotoxin contamination in shellfish. In the heat of summer, the risk of a major algae bloom (or red tide) is present. The DFO is very good about putting out notices if there’s an issue, but I tend to just avoid harvesting shellfish in the summer all together. Shellfish toxins are no joke. The toxins cannot be removed by cooking the shellfish.
Fishery openings and closures DFO. Click prohibition and search to see any current closures in the Maritime’s.
How do you dig for clams?
The basic process for digging a clam is to find it’s hole in the beach and dig until you get to the clam. The fine details vary from species to species though, so lets have a look at how to dig for each species of clam found on PEI.
Digging for Bar Clams
Look for bar clams on sandy beaches, focusing on the sand bars. You’re looking for holes and dimples in the sand. Surf clams are never more than a few inches below the surface, so require minimal effort to dig. You can use a shovel, rake, or even clam shell to dig bar clams. Many times they may be partially or even fully exposed, requiring no digging at all.
You can also dig for bar clams under the water. Areas that are not exposed at low tide are not “dug” as often as the exposed beach is. This means you can find some more clams if you’re willing to go for a bit of a swim or wade.
Using a long handled clam rake in addition to a snorkel and some googles. Go out to anywhere from ankle to waist deep water (any deeper and it makes it more difficult than is necessary). drag the rake just a few inches under the mud and you’ll eventually find a bar clam. Here’s a clip of Rick Mercer digging for clams this way in Georgetown PEI.
Snorkel and Goggles (Amazon Link). These are a good choice if you plan on wading or swimming for bar clams.
The sand seems to move more easily when it’s under water, so it’s not quite as hard on rakes as dragging them through sand on the beach.
Digging for Soft Shell Clams
Soft shell clams are found on muddy sandy beaches rather than more “nice” sandy beaches that PEI is know for. They are found buried several feet under the mud. Bigger clams tend to be further out on the beach, and are buried deeper. There are some exceptions to this rule, and you can occasionally find a big soft shell clam close to shore.
Find a hole and start digging. You’re going to be digging deep. Be mindful that they’re called soft shelled clams for a reason. A shovel or even your hand can easily break the clam’s shell accidentally.
Once you find one clam, take note of how deep it is. Other clams in the area will be buried at around the same depth. You can dig quickly until you get just above where you suspect the clam is, then start digging much more carefully so you don’t accidentally break their brittle shells. Once you reach the clam, carefully dig out the sand from around the clam. You should then be able to grab onto the clam and pull it out.
It’s nice if you can find two or three holes close to each other. Since you have to dig so deep to get a single clam, you can sometimes find two close enough together that you only need to dig one hole.
Digging for Razor Clams
Digging for razor clams is closer to hunting than clam digging. They are quick little creatures, and can dig much more quickly than you can.
You can find razor clams like any other clams by looking for their holes in the sand. They will be just below the beach unless spooked by heavy foot steps. You can also find sand “pushed” upwards slightly if the clam is level with the top of the beach. You can even find them partially exposed, sticking an inch or so above the sand. If the tide has been out for a while, the clams may be spitting water several feet into the air, making them very easy to locate.
Stalk the clam by stepping softly as you approach a likely hole in the sand. You can use either a sturdy shell or a (dull) spade for this next part. Quickly press the spade into the sand at an angle towards the razor clam. The goal is to pin it in place. If you’re too fast, you’ll break the shell and kill the clam (making it inedible). If you’re to slow, the clam will get away. You have to make a single quick, firm, and gentle movement to successfully pin the clam in place.
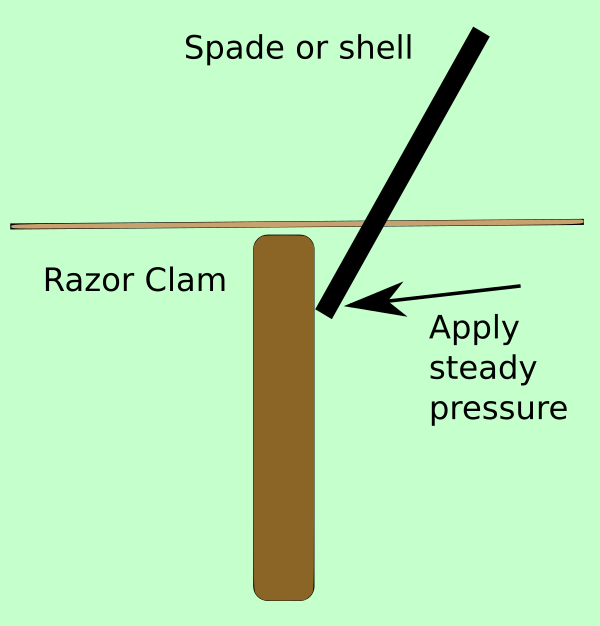
Once you have the clam pinned, it’s time to dig it out. Do not just pull it out. The clam is fighting back, trying to dig downwards while you have it pinned. The razor clam’s foot is very strong and will rip away from the rest of its body if you just pull it out. This is very frustrating when it happens, as the foot is the bulk of the meat on a razor clam.
Use your free hand to dig around the sides of the shell, while using your other hand to keep the spade pinned against the razor clam’s shell. You’ll get to the bottom of the shell, and will be able to feel it’s foot below it. Keep digging a bit further to expose the foot, and gently pull the clam out of the sand.
If you’re very quick, you can grab onto a razor clam that is sticking out of the sand and dig them out in the same way as above. Again, make sure you don’t just pull them out.
You can try to dig the razor clam out in one motion with a shovel. I’ve had some success doing it this way, but it runs the risk of damaging the clam. Often I find I’ll break the shell, or sever the foot if I try to dig the razor clam in one quick motion rather than using the method mentioned above.
Digging for Quaohogs
I have the be honest, I’ve not been successful in finding many quaohogs on PEI. Any I do find are just an incidental find when I’m digging for bar clams, they seem to like the same kind of beach. I suspect they just have a smaller population here than bar clams do.
How do you store clams when digging?
While I’m digging, I keep any clams I get in a bucket full of sea water. I don’t go clam digging in the middle of summer, so risk of the clams overheating is minimal. If you’re digging when temperatures are warmer, you’ll want to use some ice to keep the clams cool. The DFO’s recommendations can be found here.
Using the salt water method keeps the clams alive while you continue to dig more clams. When you’re done clam digging for the day, take the time to rinse and moderately scrub the clams in salt water. This removes most of the dirt off the clams.
Next, dump the water out and replace it with new sea water before heading home. You want to have fresh sea water for transporting your catch.
How do you get ride of sand in clams?
Once I’m home, I put the bucket full of clams and sea water in the bath tub. I use an aquarium air stone and air pump to aerate the water and keep the clams alive. I then leave the clams like that overnight. The clams will spit out the sand in their stomachs and siphons during this time.
An Aquarium Air Pump (Amazon Link) like this is ideal for getting ride of sand in clams.
A Portable Battery Powered Air Pump (Amazon Link) is a good solution if you want something you can bring with you.
This method works well with bar clams, quahogs, and soft shell clams to remove sand. The method does not work as well with razor clams though. This is both because they are less likely to spit out all the sand overnight, and they are much more likely to die when not eaten or shucked immediatley.
How do you prepare clams?
Store whole
One option is to just store the clams whole. Wait until the clams have spit out their sand, then either cook them within a few days (preferably within 48 hours) or freeze them whole. This method works well if you want to cook the clams with the shell on in the future, and is much less work than shucking the clams.
Shuck & store for later
Even though it’s significantly more work, I much prefer to shuck my clams. There are three main reasons for this:
- To remove any left over sand while shucking.
- To remove the stomach. Many people like the stomach, but I just can’t seem to enjoy the texture for some reason.
- I prefer to batter and deep fry my clams, and this is only possible when they’re shucked. They also pan fry very well.
You’ll want a clam shucking knife to properly shuck clams. If you don’t have a shucking knife, a moderately flexible non-serrated pairing knife will work. The knife should be just flexible enough to contour to the curve of the clam shell. Be careful using a pairing knife though, shucking knives have blunt tips and a dull(ish) blade on purpose, as it’s easy to slip when shucking clams.
A Clam Shucking Knife (Amazon Link) makes processing clams much easier, and safer. It’s a cheap investment and will save a few unfortunate cuts down the road.
The video below from tightlinevideo is an excellent demonstration on how to shuck clams. This method can be used for bar clams, quahogs, and soft shell clams. When shucking softshell clams, you have to be extra delicate to make sure you don’t break the shell. If the shell breaks, it makes the rest of the shucking process more difficult. You also risk sharp pieces of shell getting in the meat if the shell breaks.
Razor clams are shucked in a similar manner, working the knife down the length of the shell to remove the meat.
After I shuck them, I do a bit of extra processing. At this point I remove the stomach on bar clams, Quahogs, and soft shell clams. As mentioned above, I don’t much care for the stomach, but you can choose to eat it if you like. Many people actually consider them the best part of the clam, maybe I’m just fussy.
With bar clams I separate the meat into 3 categories:
- The foot, which is the majority of the meat and best part.
- The abductor muscles
- The inner lining and siphon
The different parts of the clam cook differently and at different rates, so it helps to have them separated. I separate quahog meat in the same way. The video below gives an excellent demonstration on preparing bar clams.
Shuck soft shell clams in a similar manner to bar clams, just with more care.
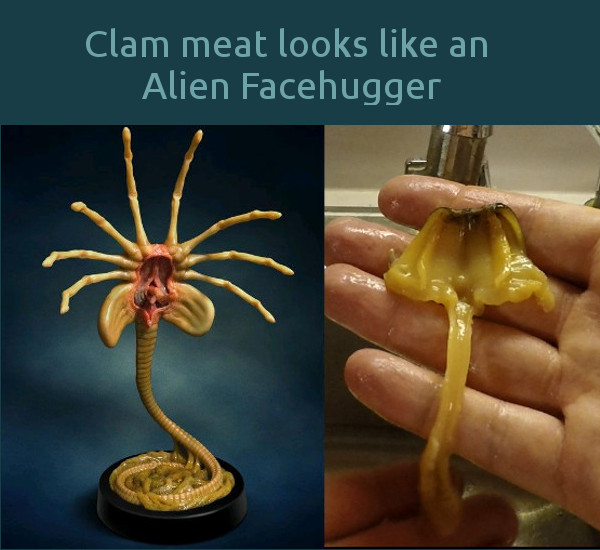
Soft shell clams have a membrane on their siphon that other clam species do not. It’s necessary to remove this thin membrane from the neck and down the side of the clam. The video below shows the process. It involves making a slight slice through the membrane and then peeling it back down over the neck of the clam. I go a bit further than this video by removing the stomach and slicing the neck open.
The foot is quite small in soft shell clams, and the bulk of the meat is in the neck. I find it worth while to slice the neck open with a knife to make sure there’s no sand in the siphon. Most of the time they’re pretty good about spitting out sand, but it doesn’t hur to check. The end result after the clam is cleaned should look like an alien facehugger.
After you’re done processing the meat, you can then either cook it immediately or freeze it. As much as i love clams, I’m usually not in the mood to eat them after shucking a bucket full of them and messing around in their guts. I usually separate the meat by type into air-tight freezer bags and freeze it to be cooked later.
A Vacuum Sealer (Amazon Link) will make freezing your clams easier. Using a vacuum sealer will prevent freezer burn and keep the meat in good condition longer than non-vacuum sealed clam meat.
How do you cook clams?
If cooking with whole clams, discard any dead or clams with broken shell before cooking. A dead clam typically has it’s shell partially open, and does not react when you squeeze the shell close a few times. A live, healthy clam should react by closing shut. After cooking, live clams will have opened fully. Any unopened clams were dead before cooking and should now be discarded.
If cooking with pre-shucked clams, I let them thaw out in the fridge for a day first. That’s just my preference though, and you can cook with frozen if you like (although maybe not if you’re deep frying).
Steaming clams
This is done with whole clams. put a few inches of water in the bottom of a pot, and add a bit of sea salt. If cooking a large number of clams, a lobster pot or stock pot works well. Put the clams either in a steamer rack or directly on the bottom of the lobster pot.
Let the clams cook for about 5 minutes for razor clams, 5-10 minutes for soft shell clams, and 15-20 minutes for bar clams or quahogs. The clams are done when the shells are wide open. Again, any shells that do not open should be discarded.
A Steamer Rack (Amazon Link) will keep the bottom clams from sitting in the water at the bottom of the pot. This prevents the clams on the bottom from being overcooked.
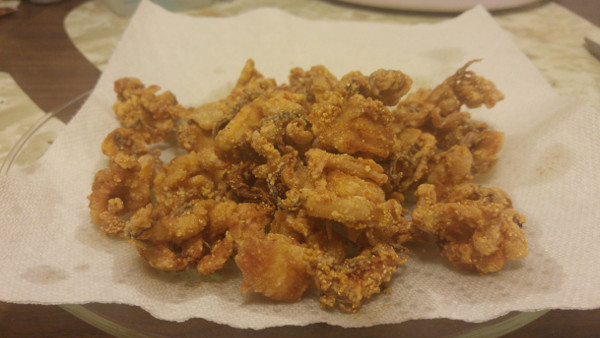
Deep Fried Clams
This is my preferred way to cook clams. The meat should already be shucked and separated. The meat may need to be further cut depending on what clam it came from and what cut it is.
If you’re keeping the stomach on, make sure you poke it with a knife before deep frying to allow the moisture to escape while cooking.
If you’re deep frying the foot off bar clams, you need to cut them into strips first. The whole foot is to thick to cook evenly in the oil. The thinner you cut the strips, the faster they will cook. I usually cut one foot into two or four strips depending on the size of the clam. These end up tasting exactly like the clam strips you’d buy from the grocery store.
If you’re cooking the shell lining/siphon of bar clams, shucked soft shell clams, or shucked razor clams, these parts can be cooked whole. If the soft shell clams you have are particularly large, you may consider cutting the siphon length wise into two separate pieces.
For ingredients you’ll need:
- Clam meat
- Eggs and/or buttermilk
- Corn flour
- All purpose flour
- Spices to taste (I’m partial to black pepper and cayenne pepper)
- Oil
This recipe is the one I more or less follow, and they do alot better job of explaining how to deep fry clams than I would.
I use a dutch oven to heat the oil to cook deep fried clams. I find it easier to control the heat than a traditinal deep fryer, and much easier to clean.
A spider skimmer (Amazon Link) is necessary for removing the cooked clams when using a dutch oven. You can also use tongs, but it’s a bit more tedious.
Pan Fried Clams
The abductor muscles from bar clams lend themselves the best to pan frying. Melt some butter or heat some vegetable oil in a pan over high heat. Sear the abductor muscles on each side for 30 seconds or so over high heat like you would scallops.
You can also cut the siphon and feet of clams into strips and cook them this way. You then pan fry these strips in a lightly oiled pan. They lend themselves well to spices being added when cooked this way. Whole shucked (or even in-shell) razor clams can also be pan fried.
Clam Sushi
The foot of bar clams are a common ingredient in sushi dishes. I don’t know much about preparing sushi, but it’s an option if you want to do some research. I’d strongly recommend looking into what safety precautions are necessary.
Useful Links
DFO’s FAQ for recreational shellfish harvest in the Maritimes
This is a very useful tool provided by the DFO of Canada. It’s an interactive map that shows areas that are either approved for harvesting bivalve molluscs, prohibited, partially prohibited (certain species), or under variation orders. The site is slow to load, so give it twenty seconds or so to load the map.
Shellfish food safety information from the Government of Canada.
Clams are a delicious form of seafood, but cooking them at home can be a little intimidating at first. You ll want to know how to prepare fresh clams, discover the secrets to shucking them, and learn how to properly cook these mollusks, so they don t end up tasting like shoe leather.