
Wondering how to start fly tying? Well before you start learning how to tie flies, you’ll need the necessary tools. The list below outlines some of the most important tools for both new and experienced fly tyers. I’ll also go into some detail on how to use the fly tying tools listed here.
This post uses amazon affiliate links. I receive commission from any sales at no additional cost to yourself.
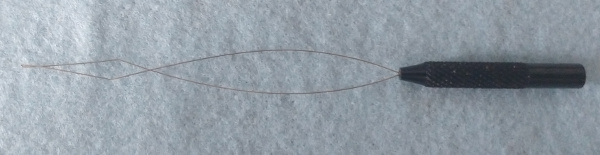
Hackle Pliers
Hackle pliers make palmering hackle infinitely easier, and are a must for anyone tying dry flies or woolly buggers. Good hackle pliers should be easy to open and close, grab onto the tying material (usually a feather) securely, and are not to heavy. There are a number of different types of hackle pliers, all with their pros and cons. Listed below are the two types of hackle pliers I use.
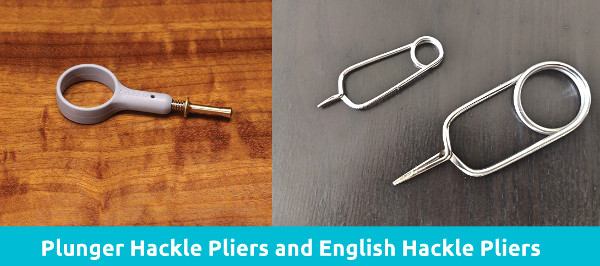
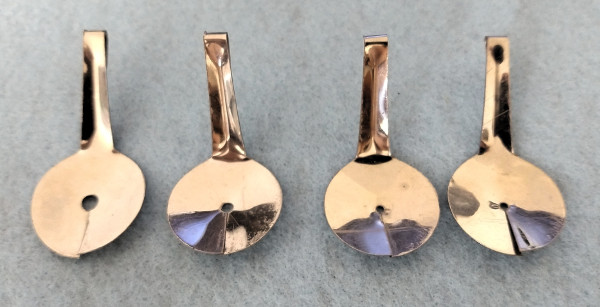
English Hackle Pliers
One of the simplest varieties of hackle pliers, I also find them the most versatile. You can get them in a variety of sizes to suite everything from tying midges to tying pike streamers. The main advantage of buying smaller pliers is that they weigh less. The weight is important because heavier hackle pliers can break smaller feathers if left to hang off the hook, or if accidentally dropped while tying.
A good set of English hackle pliers don’t have any sharp edges, so are unlikely to accidentally cut materials like some other hackle pliers. They also have a circular base that makes palmering with them very easy (with the larger sizes that you can fit your finger in atleast, the smaller sizes take a bit more care to use effectively).
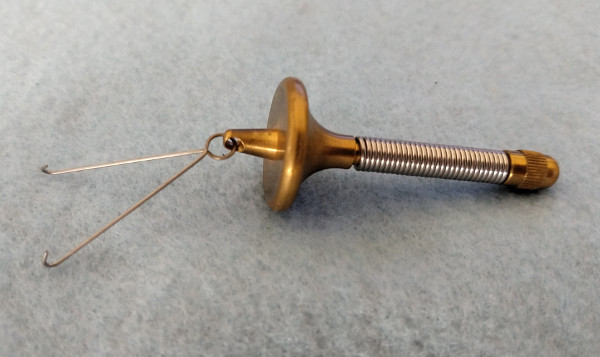
Plunger Hackle Pliers
These style hackle pliers have a little plunger that you press to grab and release feathers. The plunger style ensures a solid grip on the tying material. This makes these much less likely to slip, which is a common complaint about many other varieties of hackle pliers.
By far the most popular type of these hackle pliers are made by Stonfo. They’re well built pliers, and will last you a long time. The circular handle also makes palmering hackle even easier.
One draw back on these is that they do have a tendency to break peacock hurl and ostrich hurl. They are great for use on most hackle and marabou feathers though.
Stonfo Pinza Elite Hackle Pliers (Amazon Link)
If you’re interested in learning about different types of hackle pliers, This post does a good job of going into the fine details. There are actually a surprisingly large variety of hackle pliers available. I use both of the above hackle pliers mentioned, using them for different fly tying situations.
Scissors
Scissors are one of the most important fly tying tools. You shouldn’t use just any pair of scissors. Fly tying scissors need to be fine, sharp, and relativity small to be effective.
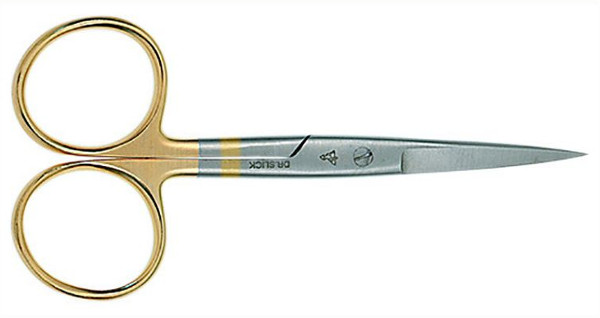
Dr. Slick’s is my favourite brand of fly tying scissors, and come in a variety of different shapes and sizes. The 4″ all purpose scissors are sufficient for most of my fly tying. The other scissors they manufacture have their uses though. If you’re tying alot of small flies, the micro tip scissors come in handy, and the hair scissors are nice for working with deer hair.
What about serrated scissors vs straight edge scissors? I’ve used both, and haven’t seen a huge difference between the two for use with fly tying. I stick to using only straight edge scissors.
There are some scissors designed for other professions/hobbies that will work for fly tying. I have a pair of straight embroidery scissors (Titech brand) that work very well. I have also used Fiskars scissors and fine tipped surgical scissors with success in the past. Just make sure you’re using high quality, sharp, needle point scissors.
Dr. Slick All Purpose Scissors (Amazon Link)
Whip finisher
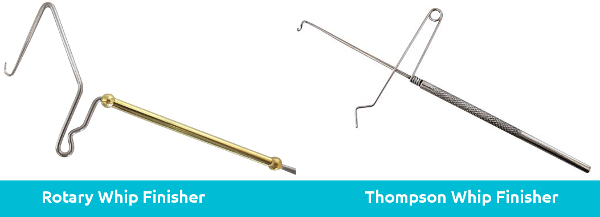
A whip finish is the “knot” that you make to finish off a fly. There are two main types of whip finisher tools on the market. The Thompson style whip finisher and the rotary whip finisher.
Let me save you a huge amount of headache by telling you to avoid the Thompson whip finisher. It does work, but is a pain to learn. I recommend learning with the rotary style whip finisher (also referred to as a Matarelli whip finisher), and still use this style today. It does still takes a bit to get the hang of it, so here’s a great video explaining how to use it.
I remember this is something I really struggled with when I first started fly tying (many years ago). Don’t get discouraged if you’re not “getting it” right away. I watched a number of Youtube videos on how to whip finish before I finally figured it out. I also started out using the Thompson whip finisher (which again I do not recommend), and was only able to figure out how to whip finish after switching the a rotary style whip finisher.
You can also learn to whip finish without a tool, which is basically a succession of half hitch knots at the head of the fly. This is a very useful skill to have as a fly tyer. It’s useful if you’ve crowded the eye of the hook to much for a whip finisher tool to be effective. It’s also useful for many types of deer hair patterns, as you can avoid trapping deer hair that may be caught by a whip finisher.
Brass Whip Finisher (Amazon Link)
Bobbin
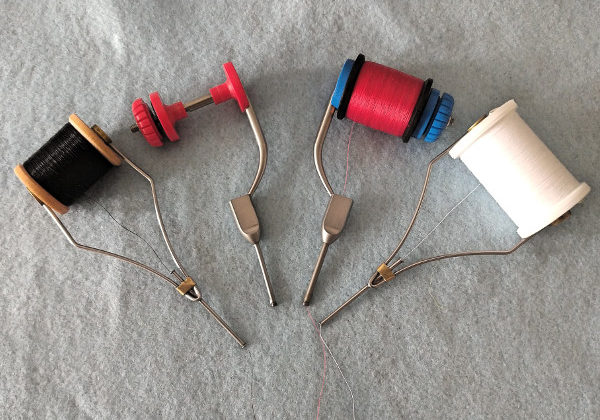
The bobbin is what holds your thread while you tie. A poor quality bobbin can cause to little, to much, or uneven tension on the thread spool, all of which makes fly tying more difficult. There are two types of bobbins I use.
Spring Tension Bobbin
The spring tension bobbin holds the spool in place with tension from the arms of the bobbin. There are many store brand and cheap bobbins I’d stay away from. The brand I’ve had luck with is creative angler. Their bobbins give just the right amount of tension for most spools of thread.
Creative Angler Bobbin (Amazon Link)
It’s worth noting that thin thread may break when used in a bobbin like this though. The bobbin holds just a bit to tightly, and when you try to pull more thread length out, the thread may snap. That’s when you need something with a bit more control, like a….
Disk Drag Bobbin
I prefer to use a bobbin with disk drag. These bobbins hold thread spools in place not by tension, but through the use of a little disk drag that you tighten down. This allows you to finely adjust how much pressure you want applied to the spool of thread. The extra control can reduce or eliminate snapped thread while tying flies. It can also more easily accommodate different sized spools of thread.
Stonfo Elite Disc Drag Bobbin (Amazon Link)
Most threads manufactured specifically for fly tying are all spooled onto similar sized spools. The issue comes when you use other thread (not designed specifically for fly tying) that’s on slightly wider or narrower spools. This is another area where a disk drag bobbin shines, as you can adjust the pressure to fit these different sized spools.
Thoughts on Thread
In regards to thread, black will be fine to start. You can worry about getting all sorts of different colours later. The thread has a relatively small impact on the overall look of the fly. It is fun to have a wide variety of colours, but black fits all situations. Black thread usually results in a sharp, clean looking head on all fly patterns.
When you do get around to having different varieties and colours of thread (it will happen… eventually), it’s worth while to get a few different bobbins. I have four bobbins all loaded with different thread, this cuts down on how often I have to swap thread in the bobbin.
A mistake I made at first was buying thread that was to thin. This thin thread broke easily, and was not the best way for a beginner to learn how to tie flies. Start with thread around 8/0 or 70D (denier) strength to avoid the thread breaking on you. This post does a fantastic (perhaps too thorough, it goes well beyond the basics) job of explaining differences in thread types and strengths.
Bobbin Threader
When I first started fly tying I though this was a frivolous tool, so I didn’t buy one right away. I endured months of threading (by hand) thread through the thread tube. This is an huge exercise in frustration, as many threads get caught right at the end of the thread tube and refuse to go all the way through.
I can say without a doubt that holding off on buying a bobbin threader was a mistake They’re inexpensive and having a bobbin threader has made my fly tying infinitely easier and less frustrating.
Bodkin
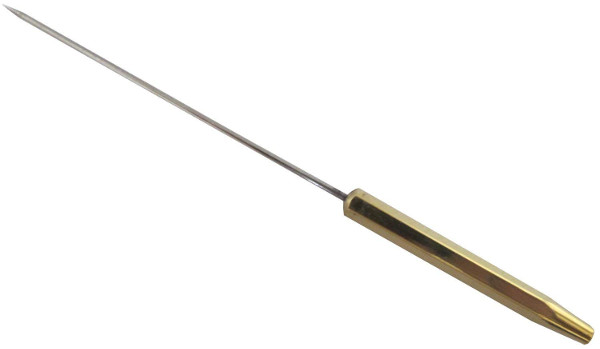
The bodkin allows you to apply small amounts of head cement, clear the hook eye of materials, or make any number of fine adjustments to a fly (such as move an individual hair, or free hackle trapped under wrapped wire). It’s another necessary tool in the fly tyers arsenal, and you’ll be surprised at how often you use it. I use it a minimum of once for every fly I tie, and I prefer applying head cement with a bodkin to using the brush that comes with the bottle of head cement.
Head Cement
I’m not sure whether to consider head cement as a tool, or if it’s more of a fly tying material. In any case, I’m including it here. Head cement is typically used on the head of the fly after performing a whip finish. This locks the thread in place and adds alot of durability to the fly, making them last longer. Head cement also has other niche uses, such as covering wing cases. In some situations, it can be used as a poor mans UV resin.
Loon Water-Based Head Cement (Amazon Link)
I go through tons of head cement and have used both quality head cement in addition to clear nail polish. They both work well, but it’s worth noting that some types of clear nail polish may turn opaque after being fished for some time. Aside from that, most types of clear nail polish work very well as a head cement substitute. I’m all about saving money on fly tying when possible.
Tying Vice
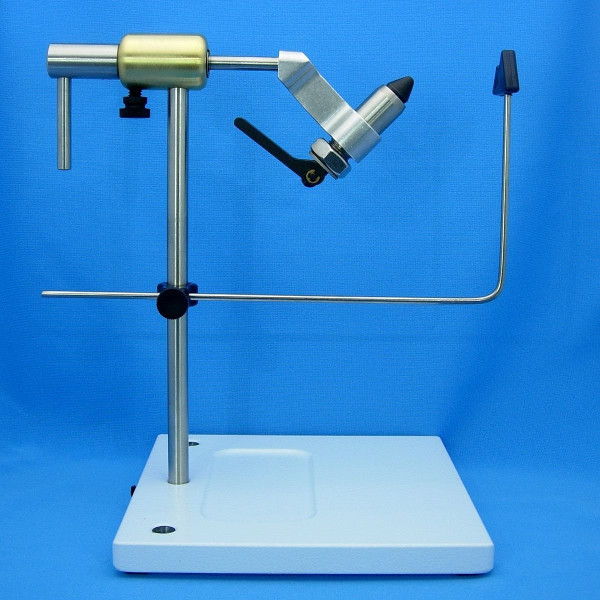
A good vice needs to hold the fly securely and be secure on the tying table. So when shopping for a fly tying vice, the two most important factors are that the jaws grip the hook well, and the vice sits or attaches securely to the fly tying desk.
The jaws that come default on most fly tying vices will work for most fly sizes. The exception is if you’re tying extremely small midge patterns, or extremely large streamer patterns. Many vices come with (or have available for purchase) smaller or bigger jaws that can be swapped out for these situations. Some jaws also have grooves that allow them to grip larger hooks more effectively.
There are two main types of bases for vices. There are c-clamp vices, and pedestal base vices. The c-clamp style vice clamps onto the edge of a desk. This mean it may not suite your needs depending on what your fly tying space looks like. The pedestal base supports the vice in it’s entirety, and only needs a flat surface to be set on. Both styles work perfectly fine, and it’s really up to personal preference. I myself use a c-clamp style vice.
In regards to rotary vices vs non-rotary vices, that’s really up to personal preference. Rotary vices are nice, but they’re much more than a new fly tyer really needs. You can lock a rotary vice in place and use it as a traditional vice, so if you’d rather buy one right from the start and grow into it, go ahead. I’m just saying it’s not really necessary until you’ve been tying for a while.
Rotary Fly Tying Vise (Amazon Link)
Hair Stacker
Hair stackers are necessary if you intend to tie alot of elk hair caddis’s or other deer hair winged flies (like stimulators). It’s important to get the tips of the deer (or elk) hair aligned if you want to produce a neat, tidy looking elk hair caddis. Since the elk hair caddis is one of my favourite searching patterns, my hair stacker gets plenty of use.
Here’s a good video on how to use a hair stacker. Here are two different articles that do a good job of explaining the differences between different types of fly tying hair.
Tooth Brush and Comb
This one’s really simple. A tooth brush is useful for loosening dubbing on flies (making them appear buggier), and making other finishing touches to flies.
A comb is primarily used to remove underfur from deer hair.
A simple dollar store tooth brush or comb is sufficient for this, no reason to go fancy here. One note I’d like to make is that some combs can result in a bit of static on the hair, making it difficult to work with. I’ve only had this happen with one off-brand comb, so it’s not a huge concern. If you’re looking for a proper fly tying comb that won’t produce static, there are bone combs available that are static free
4 More Fly Tying Tools That are
Nice to Have but Not Necessary
These next tools have niche uses, and are not necessarily required if you’re just getting started fly tying. That being said, they are very useful for their intended purpose and I own (and use) all three of the tools listed below.
Dubbing Twister
Very useful if you’re interested in making dubbing loops or craft fur brushes. Dubbing loops can be quite simple or quite complicated. You can use a dubbing loop to more securely attach slippery dubbing (such as seal fur) to the thread. You can also use it to combine a handful of materials for nymphs or streamers. Finally, you can make extremely intricate dubbing loops incorporating a large variety of materials to make some really cool looking flies.
Here’s a great introductory video to dubbing loops with Kelly Galloup.
Hackle guards
Hackle guards keep hackle and hair away from the eye of the hook so you can complete a whip finish without the material in the way. These tools make finishing deer hair bugs, or flies with hackle close to the eye much easier
Hair packer
Hair packers allow you to pack a ton of deer hair onto the hook. This is necessary to make good looking (and more bouyant) bass bugs, deer hair frogs, deer hair poppers, mice patterns, and other deer hair based flies.
The simple brass ones work very well, and are what I use personally.
Brassie Hair Packers (Amazon Link)
Hackle Gauge
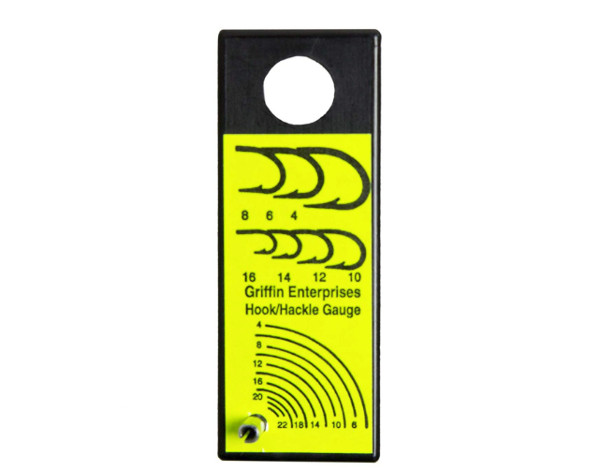
I put this down here because it really depends on what kind of fly tying you’re doing. If you’re tying mostly dried (especially mayfly patterns) then I definitely recommend getting one of these. If you’re tying mostly streamers and nymph, you’ll get limited use out of this.
I talk a little bit more about the hackle gauge, in addition to how to select dry fly hackle here.
Thank you! I’m about start flying tyer and your article is very helpful.